


A job that the average home handy person would only tackle rarely is laying ceramic floor tiles. This job is not for the faint hearted! I recently decided to tile an outdoor area that over a period of time has become a Mediterranean style covered courtyard and what better to finish it off than a floor of terracotta coloured ceramic tiles. As I have only tackled the art of ceramic floor tiling once before I decided to proceed with extreme caution and do the job stage by stage.
The first stage was to check the existing floor and decide if any remedial work was needed to be done before tiles could be laid. My floor was concrete that was in fairly good condition, all I needed to do was to remove a high spot and clean the area. If the floor had been wooden I would have needed to make sure that there was no flexing in the wooden boards even to the point of adding more floor joists as required. Once the flexing problem was fixed I would have then needed to put down an underlay that would provide a smooth substrate for the tiles. The most popular substrate used today is fibre cement sheets that are glued and nailed to the floor. In some cases a waterproof membrane is also required. However my concrete floor required neither of these treatments. My first job was to remove the slight bump in an otherwise flat surface. I did this by drilling a series of holes around the lump, to the required depth, with a masonry drill and then removing the remainder with a hammer and cold chisel.
Finally smoothing off with a concrete disc fitted to my angle grinder. The result was a floor that I could lay my tiles onto with very effort required. However some concrete floors will need work to level them off especially when the surface is cracked and chipped. Surfaces that are uneven or badly cracked and chipped will need to be repaired before tiling commences. To do this purchase some levelling compound from your local Hardware or tiling store, carefully follow the instruction for the brand you have purchased and in no time you will be ready for the next stage, which is measuring how many tiles you will need. Measure the floor area to be covered, deduct any large areas such as fitted cupboards and then add about ten percent to your total. The ten- percent is to allow for odd cut tiles and tricky areas where you may only need a part of a tile but have to use a whole tile to do the job. Any way it is better to have a couple of tiles over rather than be a few short and find out that the batch that you purchased was the last ones in the country!
So the concrete floor has been made ready and the ceramic tiles have been selected. The correct type of adhesive purchased, with help of course from the shop where you purchased your tiles. down.
I started the second stage by making sure I had the tools needed for the tiling.
Tape measure; Pencil; Carpenters square; 2 x Chalk Lines; Spirit level; Tile cutter (best to hire a good one for ceramic floor tiles) Notched trowel for spreading the adhesive (some stores will supply one free of charge when you purchase your tiles and adhesive); A rod saw for cutting odd shapes; Buckets for mixing adhesive and Grout; Rubber blade squeegee; Sponge; Clean cloths; Gloves (Heavy Duty household gloves will be fine). Most of these items should be available in your workshop if not buy good quality tools as nearly all those listed are useful for other jobs.
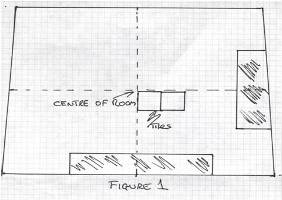
The next task is to make a plan of how you will lay the tiles. It will be a very rare occasion when the floor of the room you are tiling will be the correct size to use only full tiles. Some portion of tile will have to be fitted in somewhere. This ‘somewhere’ is usually around the perimeter of the room; the centre area is the place to have a neat network of full tiles. Also in most cases your room and floor will be out of square. You will need to stretch a chalk line between the centres of two opposite walls, then using your other chalk line stretch between the other opposite walls. The lines will form a cross in the centre of the room check this cross with your square and adjust the lines until you have an exact 90degree angle. These are the actual sketches that I made for my job (figure1 – below).
After finding the exact centre of the room and leaving the chalk line in place, I laid a row of loose tiles from the centre of the room in a cross formation to see how many full tiles I could lay in all directions. This left me with less than a full tile width across the room so I adjusted my centre point so that the gap on either side of the room was more or less equal thereby giving a more balanced look to the room. See figure two:
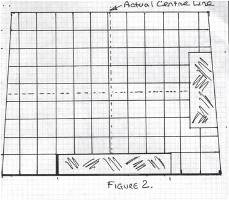
Note how in one direction that I had exactly the right width to use full tiles from wall to wall. This is unusual! In most cases less than full width tiles would have been all around the room perimeter. Spend a little time with your loose tiles to get the effect that best suits your room, adjusting but keeping those chalk lines square. When you are happy, clear away your loose tiles, once more make sure that the strings are square then snap the lines to form chalk marks on the concrete. I always take the second step of going over the chalk mark with my pencil to form a more durable mark, because these lines will be critical in keeping the tiles square while laying them.
Now we get to the third stage, laying the tiles. However before we do this you will remember from my plan that I had some tiles around the edge of the room that had to be cut. These tiles will not be cut until all full tiles have been laid the reason for this is simple its just a double check on the preliminary work that we did when laying out the tiles and also we need to make an allowance for the gaps between each tile. This gap is just a few millimetres wide but over a row of tile will make a lot of difference in the measurement of the cut tile. To make the gaps between each tile the same you can use matchsticks; lollipops sticks, or buy a bag of tile separators. Plastic tile separators were my choice; they are formed into a cross so that you will get the same gap horizontally and vertically when used on the corner of a tile.
Now is the time to prepare the surface for laying your tiles. All you have to do after your initial preparation is to make sure that all loose dirt and particles are brushed or vacuumed away and then mop over with clean water. Mix your glue to the manufacturers instructions and safety precautions.
Starting in the centre of the room where your chalk lines cross spread a bed of adhesive with a notched spreader. (once again follow the manufacturers instructions) You can either spread enough to cover one metre at a time or just enough for a single tile, the choice is yours. Maybe try a single tile until you gain confidence. Press your first tile into position where your lines cross making sure that you twist it slightly to bed it well into the adhesive. Make sure that this first tile is square to your lines and is lying level, check levels with your spirit level. Continue laying tiles from this first one spacing them with your tile spacers and checking for square and level. Only lay approximately one quarter of your floor area at a time. This is to allow the adhesive time to dry, the time for drying varying between overnight and forty-eight hours depending on the brand of adhesive you are using. Also it will allow access to the room throughout the tiling exercise. As you lay your tiles make sure that you keep the surfaces of them clean of excess adhesive, use the sponge and a bucket of water from your tool kit. Also make sure that the gap between each tile is clear of adhesive so that when all the tiles are dry, grouting them will be much easier.
Once the full tiles have been laid its time to move on to those edge tiles that need cutting. to fit. In my case I only had two sides of the room to do, in most cases the whole perimeter of the room will need to be done. If the tiles just need to be cut in straight lines then all you will need is a good tile cutter, if you need curved or odd shapes cutting you can use a rod saw or in some cases the shop where you purchased your tiles will cut them to shape for you. The best option is of course to let the shop cut them for you on their professional tile-cutting machine and this will become obvious to anyone who has cut a floor tile with a rod saw in the past. Floor tiles are much thicker than wall tiles and are much more difficult to cut.
However the first job to do is to mark where you need to cut your tile, this is a very simple job if you take some time and care. For the straight cuts place a tile over and exactly one top of the last tile in the first row, place a tile on top of this tile but this time push it up against the wall. Then make an allowance for the thickness of your tile spacer twice. The reason to double the gap is to allow silicone to be placed in the gap between the cut tile and the wall, more on this later.

Make a firm pencil line where the cut needs to be made on the lower of the two tiles. You can now cut the tile using a tile-cutting machine and you will remember that I recommended that you hire a good quality machine from either the tile shop or your local hire centre. Read the instruction on how to use that particular machine carefully or ask for a demonstration. Go all around the perimeter of the room cutting your tiles before you lay them in place. For irregular shapes use a contour gauge to accurately record the shape you are going to cut, copy this shape onto a sturdy piece of card. Cut the card to shape check it against the original shape, make an allowance for the tile spacer and silicone and then transfer the shape onto a tile. Once all the tiles have been cut lay them using the same method as you did to lay the full tile leaving a gap between both the tiles and the wall, one for grouting and one for silicone then leave to dry. When the adhesive is completely set, mix up your grout to the manufacturer’s instructions in sufficient quantities to do about two square metres at a time. Lay the grout following the manufacturers instructions and using a rubber squeegee to force the grout deep in to the gaps between the tiles. Clean up surplus grout do not let it dry on the surface of the tile. When the grout has dried off, fill the remaining gap between the edge of your cut tiles and the wall with silicone filler. You can purchase this to match the colour of your tiles.
This silicone filled gap is very important; it will act as an expansion joint during the hot summer months. Unless your tiles need a coating of silicone sealer (your supplier will have told you this when you purchased your tiles) the job is finished.
Email Chris with any DIY questions and queries you may have.
Click here to see Chris' Q&A page.

Join the Discussion
Type out your comment here:
You must be logged in to post a comment.