


Have you ever experienced anything more irritating than a dripping tap? The constant sound of water dripping on a hard surface is arguably the sound, next to your loved one snoring, is the most likely to drive you mad. Not only is a dripping tap maddening it also wastes water and causes stains on your sink or bathtub. The good news is in most cases the problem is relatively easy to cure, because the most common cause is a faulty or worn washer inside the tap.
Before you go to work on the job make sure you have the following on hand: Screwdrivers, multi-grip pliers’, adjustable spanner, and a tap washer. (If you are not sure what size your tap is, have one each of 12mm and & 18mm size available).
When working on cold-water taps, turn off the water mains at the stopcock. If you don’t know where this is located, find out, it may save you a major problem one-day. If the tap is one of the hot water one’s then you’ll also need to turn off the heating supply to the hot water tank..
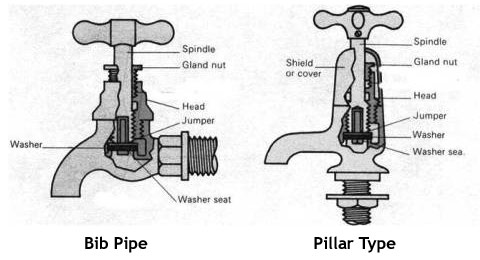
Next, turn on the tap you will be working on, to drain the pipes. The simple traditional ‘Bib’ type of tap (see illustration) has the gland nut exposed. Other taps including the Pillar style of tap (shown) have covers that must be removed to expose the nut. In most cases you will have to use your multi grip pliers to remove this cover, make sure you use a piece of cloth around the jaws of the pliers to protect the tap cover from scratching
When the nut is exposed, undo it using your adjustable spanner; remove the inner workings of the tap including the tap jumper valve, which carries the tap washer.
The washer can be removed by unscrewing either the nut or screw holding it on to the jumper valve. Take care in doing this as sometimes the screw or nut can be corroded, if this is the case use a little penetrating oil to help ease the removal. Fit a new washer of the same size and refit the assembly in a reverse order.
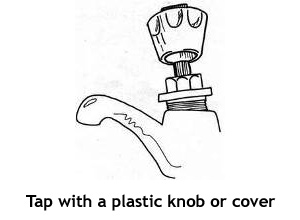
More modern taps may have a plastic knob that will need removing to expose the gland nut. Most of these taps have a coloured indicator set into the knob. Sometimes these indicators can be removed by unscrewing them or by levering them off. Try the unscrewing method first if this is unsuccessful gently insert a flat blade screwdriver under the indicator button and prise off carefully. Under this button you will find a small screw, undo this and you can remove the plastic tap knob and remove the rest of the tap workings as described above.
Finally there are a huge variety and style of taps on the market today, some of them are highly specialised and will require a tradesperson to repair. If in doubt ask at your local Hardware store if your style of tap is D.I.Y repairable.

Join the Discussion
Type out your comment here:
You must be logged in to post a comment.