


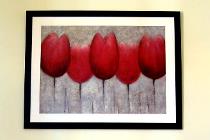
Framing your own precious mementos, be they photographs, paintings or certificates, is a very rewarding experience. All you need, besides the materials, is basic woodworking skills and an understanding of how photos etc are mounted in their frames. 
The frames are made from lengths of moulded wood with rebates. Although you can make these mouldings yourself using routers, which requires a degree of skill and patience, it's much better to purchase ready made lengths from your local framing shop or a timber yard. Make sure that the mouldings that you purchase have between 8mm and 10mm rebates, this is important because you will need to fit the following layers into this space:
| A. Section through the frame | B. Glass |
| C. Card Mask | D. Photograph or Picture |
| E. Backing Card | F. Brown Paper |
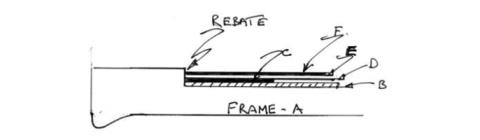
The glass is used to protect the article you are framing 3-4mm thick is fine. The card mask is made from artists' cardboard available from your local art supply shop. Its purpose is to provide a nice internal frame around the item being framed. As you will see a shape will need to be cut into the mask so that you display only those parts you want seen. The shape is usually square but it can be whatever you want. Use a very sharp craft knife very carefully for this job.
The backing card, this is made from the same card as the mask and is used to give a firm background to your photo, certificate etc. If you are framing a picture that is already on thick board you can omit the backing board. Finally brown paper is usually taped (masking tape is good) onto the back of the board to act as dust seal.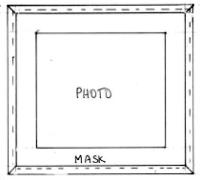
A simple final assembly should look something like this; the dotted line shows that the 'photo' extends all the way into the rebate of the frame.
Having understood what's needed to fill the frame the next stage is to build one. Picture frames are made using mitre joints these joints must be cut accurately at 45 degrees to ensure a perfect fit. You can cut them using power tools (ensuring that your circular saw has either a 40 or 60 tooth blade). However, unless you are making a large quantity, I still prefer and recommend that a Mitre Box and tenon saw be used.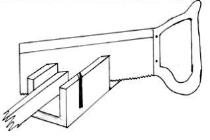
Mitre boxes and saws are available from your local Mitre 10. If you have never used one ask the salesperson in the tool department for advice and remember with tools you get what you pay for, so take a tip and buy good quality.
Goods tools may be expensive at the time but you certainly get value for money in the long term!
Measure the size of the object to be framed and the glass that will be used, all other components can be easily altered but these two are not. You will not want to cut your photo and once the glass has been cut to size you will not want to alter it either. Purchase sufficient mouldings, measure carefully and allow for the wastage when cutting the mitres. (About 500mm on average).
Picture frames are constructed from wooden mouldings with a rebate cut into the rear of the wood to hold the picture, masking card, backing card, glass and backing paper. To achieve perfectly square corners 45 degree angle mitre joints are used. When working with mitre joints accuracy is the key word. If the cuts are slightly off angle you will either have a non square frame or gaps in the joints.
 There are many ways of sawing the wood to create the mitres for your frame, however as I stated earlier I still prefer to use a mitre box and tenon saw. This arrangement gives me total control of the cut ensuring the accuracy required. A word of warning, when cutting your mouldings make sure that they are being cut the right way round! Cut from the face of the moulding down towards the rebate.
Note the direction of the mitre cuts on each part of the moulding.
When each part of the frame is cut to size the easiest method of fixing them together is pin and glue each corner. For this task 25mm panel pins and PVA glue are usually ideal, obviously the thickness of the mouldings that you choose may change the length of the panel pins. Clamp two pieces of the frame in either a bench vice or use corner clamps, just before you bring the two mitres together apply a small amount of glue. Make sure that the joints are perfectly in line. 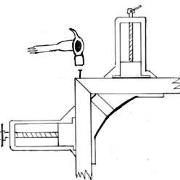
The frame must be tightly clamped, to avoid damage pad the jaws of your vice or clamps with card or thin scraps of wood. Gently knock your panel pins into the joint; the width of your frame will determine whether you will need two, four or more pins. You can of course use four clamps and complete all the corners at one time or you can fix one corner at a time. Leave the assembly to dry completely before removing from the clamp(s).
Another method of holding the frame square while its drying is to use a length of cord, a piece of dowel to act as a tension setter and four blocks of wood. 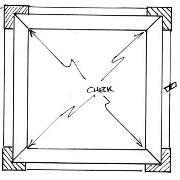
The cord is tied around the four blocks and the whole assembly tightened by twisting the piece of dowel. This will pull the frame into shape; make sure that you check the diagonal measurements whilst doing this to ensure the frame remains perfectly square.
When dry carefully punch the panel pins below the surface and fill with wood filler, sand all over and finish by oiling, varnishing or painting. You can now insert you treasured photo, picture etc and enjoy.

Join the Discussion
Type out your comment here:
You must be logged in to post a comment.