


 The following guide will help you get started with this fun and rewarding hobby. The guide explains how to organise your scrapbook photos, plan your scrapbook project, select your scrapbook album, create your album pages and store your scrapbook supplies.
Organise your scrapbook photos
If you are new to scrapbooking, the thought of organising your photos might be somewhat overwhelming. Breaking the task down into the following four parts will help you get the job done: 1) Gather your photos from your drawers, closets, shoe boxes, etc. and bring them to a large workspace such as a dining room table, 2) Sort your photos chronologically and by event, 3) Label the backs of some of your photos so that it’s easy to identify what a particular group of photos is about, and 4) Store your photos in photo-safe products until you’re ready to put them into scrapbook albums; products should say “photo-safe” and/or “acid-free and lignin-free.”
Plan your scrapbook project
Once your photos are organised, it is time to plan your scrapbook project. There are three things to keep in mind when deciding what your first project will be. First, use recent photos – work with photos that are less than one year old so that it will be easy for you to remember what they are about. Second, keep it small – choose a specific event (e.g., wedding, vacation) to start with rather than tackling a whole year’s worth of photos. Third, make it personal – use photos of an event that you were part of; this helps when it comes to journaling.
Select your scrapbook album
After you have decided what your first scrapbook project will be, it is time to select a scrapbook album. You will need to choose the style, size and design of the album.
Style: There are two album styles – strap-hinge and post-bound; the names of the styles refer to how the pages are secured in the album. A strap-hinge album lies flat when you open it so that you can work on your page while it is in the album and then slip a protective sleeve over the page when it is done. With a post-bound album, you work on your page outside of the album and then insert the page into a protective sleeve in the album when it’s done.
Size: Scrapbook albums come in a variety of sizes. The 12″x12″ album is the most popular size, but there are a number of other sizes including 11”x8.5”, 8”x8”, 6″x6”, and more. The albums are usually expandable and vary as to the maximum number of pages they can hold.
 Design: Scrapbook albums are available in many different colours, patterns and textures. You’ll want to choose an album that fits with the theme of your photos – a white album for wedding photos, a pink album for baby girl photos, a festive-coloured album for birthday photos and so on.
As long as you make sure the album is labelled as “photo-safe” and/or “acid-free and lignin-free”, it’s fine to use any style, size or design.
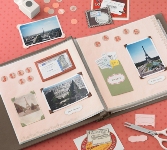
Create your album pages
Once you have selected your scrapbook album, the fun really begins as you create your album pages. There are four components to an album page.
Photos: Select 4-6 related photos and crop (i.e., trim) each one so that it focuses on the most important part of the picture. Then arrange the photos on your album page; try a number of different layouts to see what looks best.
Border/Background: Use scrapbook paper, stickers and other embellishments to create a border/background that reflects the theme of your page. Mount your border/background and your photos on your page.
Journaling: Write about the who, what, when, where and why of your photos. You can have captions for each photo, write in paragraph format about the whole page, or use bulleted text to list the highlights.
Enhancements: Add scrapbook stickers, die-cuts or other embellishments to your page. Use just a few enhancements so that they complement your photos rather than overwhelm them.
Store your scrapbook supplies
The proper storage and organisation of your scrapbook albums and supplies is very important. Photos and certain scrapbook supplies can be damaged by heat, humidity, light, acid and lignin. Use storage products that are photo-safe and keep your albums and supplies in a temperature and humidity controlled room (i.e., not in an attic, garage or unfinished basement). In addition to keeping your scrapbook supplies safe, you will also want to keep them organized so that they are easy to find whenever you are ready to work on your albums. There are scrapbook organization products designed for storing your photos, pages in progress, albums, enhancements, paper, tools and more.
Article by Lisa Fleming


Inkey60 - 15 years ago
I help in a small craft shop and we are looking for ideas of different new/old projects we can get our gifted crafts people to make. Are there craft sites on the computer will help us? Thanks