


Information brought to you by Mitre 10.
Step 1: Introduction

Watering Systems are an easy and efficient way to keep your garden looking its best all year round. A watering system lets you relax while it does all the work. It’ll give you more time to enjoy your life and your garden.
Handy Tips for the Taps – ways to make the job easier:
- Before beginning to work with your Polytube, lay it out in the sun – the longer it is left in the sun, the softer it becomes and so the easier it is to handle.
- Do not use grease or oil to make your connections with the Polytube. Rather, install your fittings by dipping your Polytube in hot water first and then insert the fitting.
- Before fitting drippers, microsprays or pop-ups, flush the Polytube first to clear any dirt which could block your system. An in-line filter is useful where water impurities are common otherwise the impurities could lead to a blocked vent or dripper.
- To lay Polytubing under a path or driveway, attach a garden hose to a length of metal or PVC pipe that is long enough to span the distance. Turn the tap on maximum pressure and push the pipe under the path – the water will “jet” out the debris leaving a tunnel for the Polytube to pass through.
- You can reseal the Polytube with a Repair Plug (a goof-plug) if you make a mistake when you pierce the tube – it’s not necessary to use glue.
- Do not wet foliage during hot days because it could result in burning of the foliage. Early morning or late evening watering is best and it helps the plant to recover from the heat of the day.
Step 2: Check Your Water Flow Rate
Your watering system will only be as good as your water pressure. In order to decide how many and what type of sprays your garden can service at any one time, you’ll first need to work out your water flow rate. This is calculated by timing the litres of water flowing from a garden tap, as described below.
The Flow Test: Water flow varies considerably from area to area. To check your flow rate you will need a standard 9 litre bucket and a watch with a second hand.
For best results we recommend that you:
- Install any accessories (eg. Water Distributor or Multiflow Adapter) before testing the water flow.
- For long runs (over 30 metres) of 13mm Polytube, test the flow at the end of the tube furthest from the tap. If water flow is insufficient, you may need to upgrade to 19mm Polytube. We also recommend that you use 19mm Polytube for Pop Up Systems.
- Turn the tap on full and time (in seconds) how long the bucket takes to fill. Use the table below to determine your usable flow rate.
| |
| Seconds to fill bucket | Useable Water Flow From Tap* (in litres per hour – lph) |
| 5 | 5184 |
| 8 | 3216 |
| 10 | 2592 |
| 15 | 1728 |
| 20 | 1296 |
| 25 | 1008 |
| 30 | 864 |
| 35 | 74 |
| 40 | 648 |
* Note: the Usable Flow Rate is calculated at 80% of the actual flow rate to allow for loss through friction.
There are different types of watering systems. (Check the manufacturer’s brochure when planning your system for the specific water flow rates of each component that you will be using.) Add together the Water Flow Rates of all the heads you plan to use on each line from the tap and ensure they do not exceed the usable flow rate from your tap.
If you are only installing a Dripper system, then you won’t need to do a Flow Test because Drippers operate most efficiently under low pressure.
Step 3: Pick your System
 Microspray Systems
Microspray systems are very popular and they are ideal for small flower beds, rockeries, ferneries and dry climate plants. The Microspray system is designed to provide individual plants with a gently spray or mist that is easily absorbed into the leaves and soil. They also minimise the problems of water run off, soil compacting and over spraying onto paths and fences. Microsprays are available in quarter circle, half circle and full circle sprays.
 Drip Systems
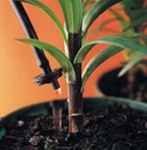
Drip systems are the most water efficient systems of all. They deliver a slow trickle of water that seeps deep into the soil to the plants’ root system. Drip systems are ideal for trees, shrubs, pot plants and hanging baskets. Drip systems are less affected by wind and evaporation than sprays are. In allowing for the right number of drippers, think about your soil type and how much water the plants need. In heavy soils such as clay, moisture is retained longer. In sandy soil, water is not retained very well and so you’ll need to place the drippers closer together and water more frequently.
 Pop Up Systems
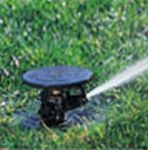
Pop Up systems provide the most effective way to water your lawn. The spray heads “pop up” when the water is turned on and retract back to ground level when the water is turned off, allowing you to mow safely over the top. Pop Ups generally come in four pattern types – quarter circle, half circle, ¾ circle and full circle. The number of Pop Ups that you’ll need will depend on your water pressure. For optimum water flow, we recommend that you use 19mm Polytube for your Pop Up system. Keep in mind also that the spray from the Pop Up sprinkler falls over a certain radius. So, to ensure an even distribution of spray, lay the sprinkler system so that the radius of each spray overlaps slightly with that of the next spray. A good way to achieve this is to place your sprinkler system in a loop or “U” shape.
Step 4: Sketch a Plan for Yourself
We recommend that you use graph paper to draw up a plan of your garden. Sketch in building outlines, pathways, the position of trees and any obstacles so that you can see the actual areas where you want to water. Then mark in where the main Polytubing from the tap is to be placed. Off this, mark where distribution lines are to go for the areas to be watered and mark where Drippers or Microsprays are needed. The main tubing can be a larger diameter than the tubing used as distribution lines so that more than one distribution line can be run at a time.
Note: You cannot place a Dripper and a Microspray on the same line. They are designed for different types of plants and different watering rates.
Now write up a list of what you need – sprayheads, drippers, tubing etc. You can also take your plan to a Mitre 10 store and let them give you advice.
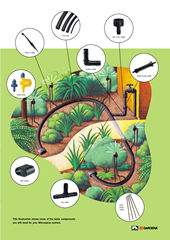
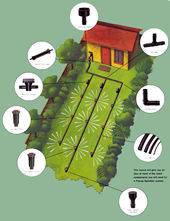
For examples of how to lay out each type of sprinkler system, please refer to the diagrams on the right hand side, below.
Step 5: Installation
Before you begin, make sure that the number of heads you are installing does not exceed your Usable Water Flow rate. Use your plan to lay out all the sprinkler system parts where you intend to install them. You can use bricks to hold the Polytubing in position. Working from the top and moving in the direction of the water flow, adjust the layout until the main tubing and distribution lines are suitably located. Cut the Polytubing to size with a utility knife or secateurs. You can connect all tubing with joiners, elbows or tees to form your desired layout. Secure each connection with a locking clamp and check that there are no kinks in the Polytubing.
Seal the end of the Polytube with an End Sleeve. Referring to your plan, pierce the Polytube at the appropriate points using a Spanner Punch. Don’t worry if you make a mistake – you can get a plug for any holes that you’d like to fill.
Insert a Dripper by pushing the barbed inlet into the Polytube.
For Microsprays, you will need to assemble the Stake and Rigid Riser Tubes. (Stakes are available to give risers extra support.) Attach the riser tube to the stake and then push the stake into the ground. Rigid riser tubes can be inserted directly into the main Polytube line. The reason that you use a riser tube is to raise Microsprays off the ground. If they are screwed directly into tubing that is on the ground, they can become blocked by soil splashing up when it rains.
Pop Ups are joined to the main Polytube by cutting the line and inserting Elbows, Tees and Joiners. Remember to use hose clamps on the line first to secure the joins. Attach the Pop Ups to a threaded Tee or Elbow.
 Finally, cover the Polytubing with soil.
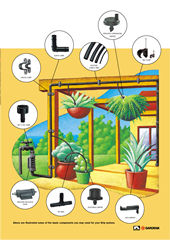
Step 6: Material & Tools Checklist
Look for the Microspray Starter Kit for beginning a Microspray system.
- All systems use polyethylene tubing cut to the length you require. Drip and Mircrospray systems use 13mm poly tubing whereas Pop Up systems need 19mm tubing.
- Stanley knife or secateurs.
- Repair plugs – to seal unwanted holes in tubing
- Spanner key punch – for fitting sprays to tubing.
- End stops – to seal open ends in tubing
- Tees – for T-junctions
- Elbows – for right angles or sharp bends
- Joiners – for straight connections
- Nuts and Tails – for connecting to the tap
- Locking clamps – for all connections to prevent leaks.
- Spade – to lay tubing in soil.
Limitation of Liability
This project has been produced to provide basic information and our experienced staff are available either in-store, or via phone or email, to answer any questions you may have. As this information is generalised Mitre 10 is not responsible for the application of the principles in any particular case, as the contents of this project may need to be modified for the particular site and circumstances. Consumers should always ensure that they comply with any local body bylaws that pertain to any construction project and consult a qualified tradesperson where expert services are required.


Join the Discussion
Type out your comment here:
You must be logged in to post a comment.