


Sometimes you may need to take a screen shot of your computer or certain pages you are working on, here is a brief tutorial on how to take a screenshot first on a Windows operating system the Mac.
Full notes are detailed below the video.
Windows notes:
Step 1: Open the window or file on a PC
On a Windows PC, open the window or file you want to capture and make sure it is the “active” window on your monitor.
Tip: The “active” window is the window that is in the foreground on your computer screen.
Step 2: Press the Print Screen button
Press the Print Screen button on the top right corner of your keyboard to take a picture of your entire screen.
Tip: If you want a screenshot of only the active window, hold down the Alt key while pressing the Print Screen button.
Step 3: Open a graphics program such as paint or word
Open a graphics or word processing program. Hold down the Control key and press the V key to paste the screenshot into your chosen program.
Tip: You can also paste screenshots directly into the body of an e-mail and send as an inserted graphic.
Step 4: Save the file
Choose File on the top menu bar and click on Save As. Locate the file where you would like to save the screenshot in the Save As window, name the file, and save it.
Step 5: Send
Attach screenshots to e-mail, print them out, or insert them into documents, just as you would with any other digital file.
Mac Notes:
Step 1: Take a screenshot on a Mac
On a Mac, hold down Shift, Command and the number 3 to take a picture of your entire screen. A file will automatically save to your desktop.
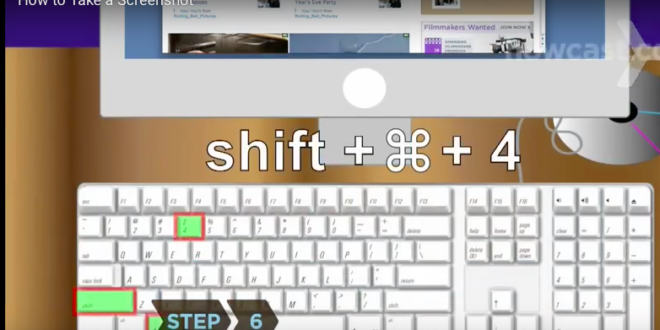
Step 2: Take a shot of part of the screen
Hold down Shift, Command, 4 to take a picture of an area of the screen. Hold down the mouse button, run the select tool over the area you’d like to shoot, and let go. A file will save to your desktop. Find the screenshot file on your desktop, and change its name and location if you wish.
Step 3: Send
Attach screenshots to e-mail, print them out, or insert them into documents, just as you would with any other digital file.

Donna Wayne - 7 years ago
These are pretty simple to use, but I still can’t understand why Windows doesn’t improve the quality of the screenshots. Whenever I take and save a screenshot it is a bit blurry, and I cannot send it to anyone to see it clearly. I have to use an open source software that I found here: http://www.paintshoppro.com/en/pages/screenshot/ so these shortcuts I only use to make some notes for myself.